Switches, keyboard emulators & JavaScript
Perhaps one of the easiest way to get started in physical computing is to use the simplest input of all: the on/off switch. You might think a switch is a pretty boring way to sense the world but you would be very wrong. In this article, I will discuss some of the possibilities switches can offer as well as how to use them on the web platform and more specifically with JavaScript.
About switches
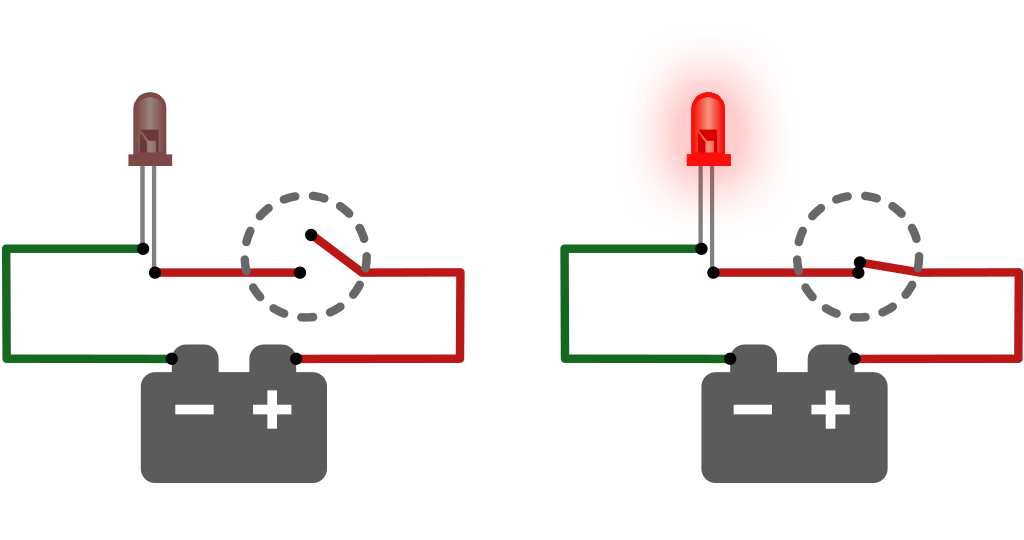
First of all, let’s clarify what a switch is. The switch, simply put, allows or blocks the flow of electrical current in a circuit.  It cannot get any simpler than that. Either the wires touch, the current flows and the light lits up or they don’t, the current does not flow and the light turns off. Now, instead of powering a light like in the example above, we can replace the LED with a device that will detect if the circuit is open or closed. One such device is called a « keyboard emulator » (aka keyboard encoder). Because of its simplicity, it might just be the best device to get you started in physical computing.
About keyboard emulators
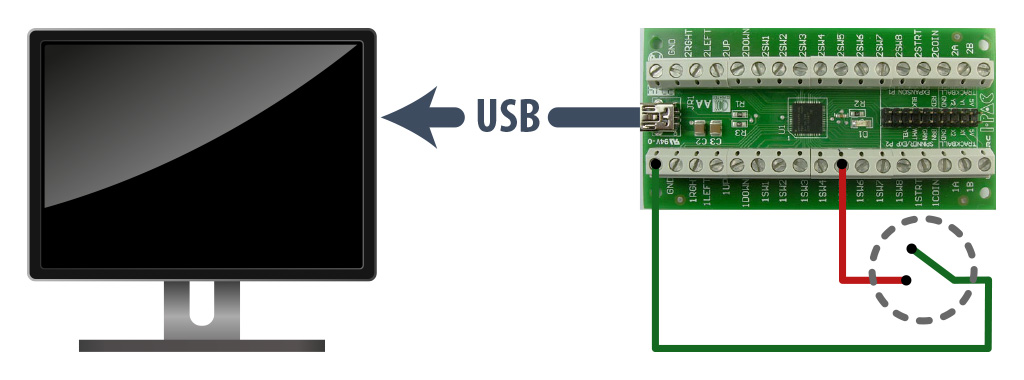
A keyboard emulator is just like a computer keyboard except that instead of having keys we can press, it has inputs we can hook switches to. This means we can connect any ol’ switch to one of the inputs and, by triggering the switch, the emulator will send a key press to the computer it’s connected to (typically via USB). Let’s look at the diagram below:  It features an I-PAC VE keyboard emulator from Ultimarc hooked up to a computer via USB. An on/off switch has been connected between its ground pin (
GND) and the input pin labeled
1SW5. If we press the switch – here’s the magic – the letter
W will be sent to the computer. Why “w”, you ask ? Simply because this pin, on this particular model is configured to send the letter “w”. Other pins are configured to send other keys. As you might have guessed, it is then super easy to listen for the
keydown event on the host computer and perform any desired action. Now, obviously, you are not limited to using only plain switches. You can use any device that lets the current pass or not. It could be a:
- Magnetic switch (aka reed switch): This is a switch activated by a magnet such as those installed on windows and doors in a home security system. What’s cool about them is that you can hide the magnet in any object. When that object is near the magnetic switch, the input gets triggered.
- Motion sensor switch: Also standard in a home security setup. It will let you know when someone enters a specific space.
- Mat switch: Often designed for heavy machinery operator, this switch activates when someone steps on it. Think: Dance Dance Revolution.
- 8-position joystick: Many joystick are actually made up of 8 switches. There is one for top, right, bottom and left and one for each intermediate positions. You can hook up such a joystick to 8 inputs on the keyboard emulator.
- Tilt switch: A switch that activates when in a certain position and deactivates when tilted to a different position.
- etc.
You can even build your own switch. For instance, you could create a metallic wind chime where multiple circuits runs through the chimes. When the chimes touch, the inputs are triggered.
Using it in JavaScript
So, how can we use all that in JavaScript. Well, it’s a simple matter of listening for keydown and keyup events:
|
1 2 3 4 5 |
document.addEventListener('keydown', keydown, false); function keydown(event) { console.log(event); } |
However, it can be tedious to look up the keycodes for your particular brand of keyboard emulator. That’s why I created a little library called TangibleKeyboard based on the nice KeyboardJS library by Robert Hurst. On top of the regular qwerty layout, it provides layouts for popular keyboard emulator models such as the I-PAC VE shown above. This means you can listen to emulator inputs simply by using the labels printed on the board:
|
1 2 3 4 5 6 7 8 9 10 11 12 13 14 15 |
<script src="scripts/tangiblekeyboard.js"></script> <script src="scripts/layouts/tangiblekeyboard.layout.ipacve.js"></script> <script> TangibleKeyboard.setLayout("ipacve"); var binding = TangibleKeyboard.on( "1SW5", { onKeyDown: function(e, keys, combo) { console.log(e); }, preventRepeat: true, preventDefault: true } ); </script> |
Lines 1, 2 and 5 import the library, import the IPAC-VE layout and activate it. Then, lines 7 through 14 tell the library to execute a function when the 1SW5 emulator input is triggered. The library also include two other niceties (lines 11-12). The first one is the ability to prevent the triggering of multiple keydown events when a key is being held down. The second is the ability to deactivate any browser functions already tied by default to certain keys (the TAB key, for example). Alternatively, depending on your needs, it might be easier to continuously probe the library for currently active keys. This would be the case if you are using a joystick for instance:
|
1 2 3 4 5 6 7 8 9 10 11 12 13 14 |
<script src="scripts/tangiblekeyboard.js"></script> <script src="scripts/layouts/tangiblekeyboard.layout.ipacve.js"></script> <script> TangibleKeyboard.setLayout("ipacve"); function check() { console.log(TangibleKeyboard.activeKeys); setTimeout(check, 50); } check(); </script> |
In this scenario, TangibleKeyboard.activeKeys contains an array of all the currently active inputs. You could then use activeKeys.indexOf() to check if a specific input is active or not. Follow this link to download the library (also available on GitHub). The full API documentation is also at your disposal. As you can see, using switches with a keyboard emulator is simple and provides many ways to sense the world around you. It’s an easy way to enter the world of physical computing.
The switch in the header image is a creation of Designer Board (link down) and is used in accordance with the usage terms.


9 Comments
Great article and JS library, thanks for sharing. I’ve successfully installed a detect switch using the I-PAC but I’ve ran into a scenario where I need to detect 3 switches (keys) at the same time. Specifically, I need to fire a single event when 3 switches are simultaneously down and fire another event when those same 3 switches released. Any help on accomplishing this would be much appreciated.
Found my own answer in the documentation. Ended up with essentially this to make it work.
Cool. Thanks for sharing.
I’m now trying to fire a separate event in between a KeyDown and a KeyUp. So I want to fire an event by holding down ‘v + c + x’ (I have this is working) then have another KeyDown ‘p’ for a separate event. What I’ve noticed is that when I press any key (not just ‘p’) while holding down ‘v + c + x’, the ‘v + c + x’ KeyDown event will fire off as a new KeyDown. Is there any way to keep that from firing but while retaining that the keys are still being held down so that my ‘v + c + x’ KeyUp will fire it’s event when key are released? Any tips would be much appreciated.
Sorry for the late reply! If I understood you correctly, I believe the following will solve your issue:
Hope this helps!
Worked beautifully. Thank you for the help!
Another plea for help here. Everything was working great until I built up a prototype. I overlooked the fact that during real usage the interface (which uses cards along with a slider) will be left with either A S or Q with a KeyDown. Hence, when card is removed or another card is inserted the ‘Z + X + C’ Up/Down only event is not firing – the 4 key combinations still work though. So I can hold A down and switch cards and the ‘Z + X + C + A’ or ‘Z + C + V + A’ event fires as needed but I never see my card specific menu come up or go away which I had firing based off ‘Z + X + C’ only event. Further, I can switch cards and with card inserted use the A S or Q keys and have the desired results – that part actually works great but still no card specific menu. Drawing of setup here with more explanation. Again, any suggestions would be much appreciated.
I’m not sure I understand your problem…