

Viewing Webcam Feeds and Grabbing Still Frames in a Modern Way
Listing available webcams, identifying supported resolutions, viewing live video and grabbing frames should all be pretty straightforward things, right? Well, it turns out that, even in 2017, they are a little more tricky than one might expect. This article will help you do all those things while avoiding the gotchas that pave the way to webcam control.
As you may know, the legacy navigator.getUserMedia() approach has been deprecated and is no longer a web standard. Therefore, we will be using the brand new, hopefully future-proof, MediaDevices approach. The Media Capture and Streams API offers a modern, promise-driven, getUserMedia() method that is fully supported in Chrome (53+), Firefox (38+) and Edge. While this API is not yet supported by all browsers, it is definitely the way of the future. If you need to support other browsers, you should take a look at adapter.js. If you develop physical computing projects with NW.js or Electron, you are all set to go!
Getting ready
Before we start, you should know something. The getUserMedia() method no longer works on insecure origins. If you try to run the code presented on this page via a regular HTTP connection, this is the error message you will get in the console:
![]()
This means you need to serve your webcam-enabled web pages over the HTTPS protocol. This can be pretty annoying if you do not currently have an SSL-protected website but is very unlikely to change. Other APIs that interact with hardware (such as WebUSB) are starting to do the same. An easy way to get HTTPS hosting for testing purposes is to use GitHub Pages.
Obviously, you do not need to worry about that when developing desktop applications with NW.js or Electron. Also, this warning does not show up when working locally or when launching the Chromium environment with the --disable-web-security switch enabled.
Before we begin, you may want to take a look at the end result. It’s nothing fancy but it should work in all browsers that support the Media Capture and Streams API. You can also download the code from the GitHub repository.
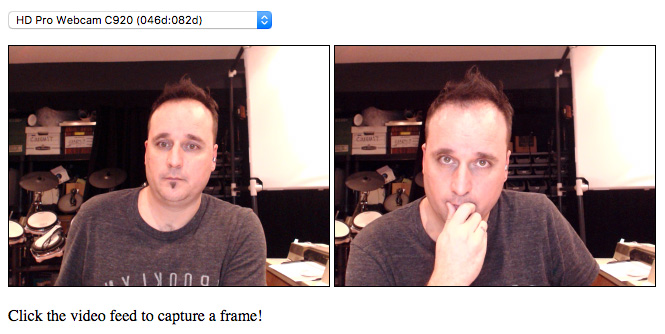
This article is mostly concerned with JavaScript. However, to follow along, you will want to create an HTML page that looks somewhat like ours:
|
1 2 3 4 5 6 7 8 9 10 11 12 13 14 15 16 17 18 19 20 21 22 23 24 25 26 27 |
<!DOCTYPE html> <html lang="en"> <head> <meta charset="UTF-8"> <title>Viewing a Webcam Feed and Grabbing Frames with the MediaDevices API</title> <style> #webcam, #capture { display: inline-block; border: solid 1px black; width: 320px; height: 240px } #dropdown { display: block; } </style> </head> <body> <p><select name="dropdown" id="dropdown"></select></p> <video id="webcam"></video> <canvas id="capture" width="320" height="240"></canvas> <p>Click the video feed to capture a frame!</p> <script src="script.js"></script> </body> </html> |
All the code will be added to the script.js file linked at the end of the <body> tag. Here we go!
Listing Devices
Usually, the first thing we need to do to get started is retrieve a list of available devices. This can be done with the enumerateDevices() method. However, this is where we meet our first gotcha. If you call enumerateDevices() from a domain which has not yet been authorized by the user, you will not be able to display the device names (e.g. HD Pro Webcam C920). It works this way for security reasons. This means you will be left with only the device id which looks something like this: 3979789ae039722b10cffb86b5add18c88ac10439f760ac3d9785db3486273a3. Not the most user-friendly thing…
Again, if you are using NW.js or Electron, you do not need to worry about this.
To make sure the user has authorized the page to use the webcam, we can call getUserMedia() for the sole purpose of triggering the authorization prompt. This feels a bit hackish but works great. Let’s create a function that does that and call it:
|
1 2 3 4 5 6 7 8 9 10 11 |
function triggerAuthorizationPrompt() { if (!navigator.mediaDevices) { throw new Error("The MediaDevices API is not supported."); } return navigator.mediaDevices.getUserMedia({video: true}); } triggerAuthorizationPrompt(); |
If this domain has not yet been authorized, this will trigger the webcam authorization prompt. If it has, this will not do anything. In Chrome, you can see if a domain has already been authorized for webcam usage by looking at the right side of the address bar:
![]()
If you want to simulate problems with users blocking access, you can click this icon to revoke the permission.
So, that’s one hurdle out of te way. It’s now time to retrieve a list of available devices (with their names!). We can do so by calling the enumerateDevices() method. This method returns three kinds of devices: audioinput, videoinput and audiooutput devices. Since we only care about videoinput devices, let’s create a new function that will return only those:
|
1 2 3 4 5 6 7 8 9 10 11 12 13 14 15 16 17 18 19 |
function getWebcams() { return new Promise((resolve, reject) => { // Filter found devices to only keep "videoinput" devices navigator.mediaDevices.enumerateDevices() .then(devices => { let filtered = devices.filter((device) => { return device.kind === "videoinput" }); resolve(filtered); }) }); } |
As you can see, this function returns a Promise. Like most newer web APIs, the MediaDevices API uses promises instead of callbacks. If you are not yet familiar with them, you really should get to know them because they are not going away any time soon.
The promise that is returned by enumerateDevices() is fulfilled with an array of devices. We filter this array and fulfill our own promise with the filtered array containing only video input devices.
With our getWebcams() function ready, let’s see which devices are actually available on our machine. To do that, tag two new then() after triggerAuthorizationPrompt() :
|
1 2 3 |
triggerAuthorizationPrompt() .then(getWebcams) .then(webcams => console.log(webcams)); |
The first then() calls our new function and the second one receives the result in the webcams parameter and passes it to console.log(). Here is what I see in the browser’s console when running that code on my MacBook Pro which has a built-in camera and an external Logitech camera:
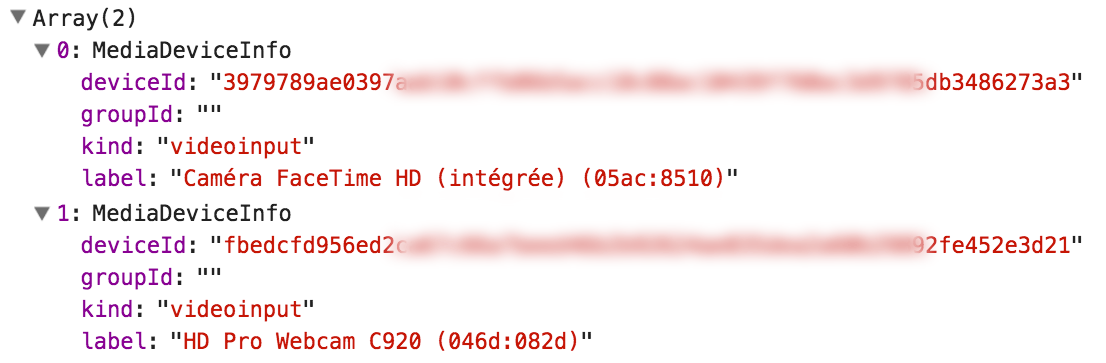
As you can see, we received an array of MediaDeviceInfo objects that contain two very important pieces of information. The first piece, the label property, provides information about the webcam model (this would have been empty had we not forced the user to authorize access). The second piece is the deviceId. We will need that if we want to connect to a specific device instead of letting the browser use the first one it finds.
Let’s use the device id and the label to create a dropdown selection menu. We can do so by creating a function that accepts an array of webcams as a parameter and adds them to the barebones dropdown menu found in the HTML file:
|
1 2 3 4 5 6 7 8 9 10 11 12 |
function populateDropDownMenu(webcams) { let dropdown = document.getElementById("dropdown"); webcams.forEach((cam) => { let option = document.createElement("option"); option.text = cam.label; option.value = cam.deviceId; dropdown.options.add(option); }); } |
All we do is retrieve the label and deviceId and use them to populate the dropdown. As a safety precaution, we fall back to using the deviceId for the option’s text should the label be empty (as discussed earlier).
Let’s now call this function as soon as we receive the list of available webcams:
|
1 2 3 |
triggerAuthorizationPrompt() .then(getWebcams) .then(populateDropDownMenu); |
This time, instead of simply logging the webcams array, we pass it to the populateDropDownMenu() function. At this stage, you should see your webcam(s) appear in the dropdown menu.
Viewing the Live Feed
To view the video feed from the selected webcam, let’s create the onWebcamSelected() function which will be called anytime a new webcam is chosen:
|
1 2 3 4 5 6 7 8 9 10 11 12 13 14 15 16 17 18 |
function onWebcamSelected() { // Fetch our video element let videoElement = document.getElementById("webcam"); // Retrieve the webcam's device id and use it in the constraints object let dropdown = document.getElementById("dropdown"); let id = dropdown.options[dropdown.selectedIndex].value; let constraints = { video: { deviceId: { exact: id} } }; // Attach the webcam feed to a video element so we can view it return navigator.mediaDevices.getUserMedia(constraints) .then(stream => videoElement.srcObject = stream); } |
The first thing the code above does is retrieve the <video> tag (we will need it later). Then, we grab the device id of the currently selected item in the dropdown. This id is then used to build a MediaStreamConstraints object. In our case, the only constraint is that the device match the id.
You could use other conditions in the constraints object such as a minimum width and/or height or a specific aspect ratio. Here is the full list of constrainable parameters:
aspectRatiochannelCountdeviceIdechoCancellationfacingModeframeRategroupIdheightlatencysampleRatesampleSizevolumewidthYou might assume that, when you are connecting to a camera, you will receive the highest resolution offered by the camera. That’s not necessarily the case. So, if you want to make sure you are getting a full HD frame size you could use something like this:
On Chrome, some conditions currently seem to be flaky. For example, to define the constraints for width and height, you can use either a Number or a ConstraintLong object. This object has 4 properties: min, max, exact and ideal. When I tried to use the ideal condition combined with the min condition, I would always get the min size even though the camera supported the larger ideal size.
The point here is: this API is still under development!
This constraints object is passed to the getUserMedia() function. If the request is successful, we get a stream which we then assign to the srcObject property of the videoElement. This is the step that actually makes the feed viewable.
Obviously, we need to call that function somewhere. Let’s call it when the script first runs and also when the dropdown’s value changes. To run it at startup, add a second then() clause at the end of the file:
|
1 2 3 4 |
triggerAuthorizationPrompt() .then(getWebcams) .then(populateDropDownMenu) .them(onWebcamSelected); |
To call it when the dropdown’s value changes, add the following line at the end of the populateDropDownMenu() function:
|
1 |
dropdown.addEventListener("change", onWebcamSelected); |
At this stage, you should see the live feed from your camera. If you have more than one webcams, you should also be able to switch between them.
One thing you will quickly notice is that a camera is not a mirror. If you want the image to behave like a mirror, you will have to flip it along the horizontal axis. An easy way to do that is via CSS:
|
1 2 3 |
#webcam { transform: scaleX(-1); } |
Disconnecting the Feed
As far as I know, there is no explicit method to disconnect a feed from a <video> element. The solution below has proven effective for me. If you know of a better approach, drop me a line.
|
1 2 3 4 5 6 7 8 9 10 11 12 |
function disconnectVideoStream() { // Fetch video element. If it does not have a stream, we are done. let videoElement = document.getElementById("webcam"); if (!videoElement.srcObject) return; // Pause the video, stop all tracks and make sure no reference remain. videoElement.srcObject.getTracks().forEach( track => track.stop() ); videoElement.srcObject = undefined; videoElement.src = ""; } |
The main difference with the legacy Navigator.getUserMedia() approach is that you must call the stop() method on each track instead of calling it on the video element itself.
Grabbing a Still Frame
A cool thing to do with a live webcam feed is grabbing frames for further processing. Grabbing a frame basically means drawing one image of the video feed into an empty <canvas> element. Once the image has been drawn on the canvas, there are tons of things that can be done with it such as applying effects.
|
1 2 3 4 5 6 7 8 9 10 11 12 13 14 15 16 17 18 19 20 21 22 23 24 25 26 27 |
function captureToCanvas() { // Retrieve source, canvas and 2D context let source = document.getElementById("webcam"); let canvas = document.getElementById("capture"); let context = canvas.getContext("2d"); // Here we take into account the fact that the webcam might // not have the same aspect ratio as the target canvas. let ratio = canvas.width / canvas.height; let height = source.videoWidth / ratio; let yOffset = (source.videoHeight - height) / 2; // Draw the snapshot/image onto the canvas. context.drawImage( document.getElementById("webcam"), 0, yOffset, source.videoWidth, height, 0, 0, canvas.width, canvas.height ); } |
As you can see above, we need to grab references to a few things: the video element playing the webcam feed, the canvas where the image will be drawn and a 2D drawing context which we will use to draw inside the canvas. Those thing are enough to do the drawing. However, since the webcam’s width to height ratio might be different than that of the canvas, we do a bit of math so that we use the full width and resize the height according to the ratio of the source.
With that done, we use the drawImage() method of the context to perform the actual drawing. This function has many parameters which you can look at in details by viewing the object’s documentation.
All that’s left is to trigger the function. In this case, we simply add a listener to the <video> tag by adding the following code at the bottom of script.js :
|
1 2 3 |
document.getElementById("webcam").addEventListener("click", () => { captureToCanvas(); }); |
At this stage, you should be able to grab frames at will.
One thing you probably noticed is that our CSS mirror effect is not being applied to the image drawn on the canvas. This is normal. CSS transformations are not taken into account by the drawImage() method. In order to get the same effect when drawing on the canvas, we need to apply a similar transformation to the drawing context. Add this code just before the call to drawImage() :
|
1 2 |
context.translate(canvas.width, 0); context.scale(-1, 1); |
This translates the matrix off to the right and then flips it back into place.
These transformations should be removed once we are done drawing (otherwise the image will keep flipping each time we click). To do that, we usually save the context before applying the transformations and then restore it afterwards. Here is the full captureToCanvas() function with these changes added:
|
1 2 3 4 5 6 7 8 9 10 11 12 13 14 15 16 17 18 19 20 21 22 23 24 25 26 27 28 29 30 31 32 33 34 35 |
function captureToCanvas() { // Retrieve source, canvas and 2D context let source = document.getElementById("webcam"); let canvas = document.getElementById("capture"); let context = canvas.getContext("2d"); // Here we take into account the fact that the webcam might not have the same aspect ratio as the // target canvas. let ratio = canvas.width / canvas.height; let height = source.videoWidth / ratio; let yOffset = (source.videoHeight - height) / 2; // Flip the image to match the webcam (mirrored) context.save(); context.translate(canvas.width, 0); context.scale(-1, 1); // Draw the snapshot/image onto the canvas. context.drawImage( document.getElementById("webcam"), 0, yOffset, source.videoWidth, height, 0, 0, canvas.width, canvas.height ); // Remove the translate and scale transformations context.restore(); } |
There you have it. I hope this has proven useful. As always, you are welcome to comment below to further the discussion.
Cheers!
The header image of the webcam was designed by Freepik and is used in accordance with their licensing terms.
4 Comments
Nice and tidy, thanks much.
I am making this into an Electron app for my wife’s animation projects. I would like to add a feature so that she can choose a directory, and with every click the image is saved and enumerated in that directory. This will then be wired up to her foot-operated mouse.
Best,
Dan
Cool, thanks!
You should be able to do all that with Node.js’ File System API.
Hey there a more efficient way to grab the image frames from the webcam without having the copy from the canvas?
I don’t think there is another way but I’d love to hear it if it exists!!