

Web MIDI: Music and Show Control in the Browser
Earlier this year, Google released Chrome 43. This release marked the official introduction of an amazing new feature: MIDI in the browser! The magnitude of this news for fans of physical computing cannot be overstated. This means you can a) control external MIDI devices from JavaScript and b) use MIDI devices to control what’s happening in your web browser. I almost cried… And the best part is: it actually works!
About MIDI
The MIDI (short for Musical Instrument Digital Interface) protocol is over 30 years old. It has stood the test of time and is now supported in nearly all electronic musical instruments known to mankind. If you want to interface with synths, samplers, wind controllers, sound modules and drums machines, MIDI is the way to go (there is also OSC but that’s for another article). It also works with various non-traditional controllers and various control surfaces. If you are curious, here are a few crazy-cool ones: AlphaSphere,(link down), Tenori-on, Pianocade, Da Fact, Breath and bite controller.
MIDI is also supported in pretty much all music software and various development frameworks such as Pure Data, Max/MSP and openFrameworks. This means that it is an ideal protocol to exchange live or recorded data with other software on your machine.
MIDI is even used as a show control protocol designed to drive various stage and entertainment equipments such as lighting gear, smoke machines, pyrotechnic devices, etc. This is pretty powerful stuff… and, thanks to Google Chrome and the Web MIDI API, it’s now available in your browser.
About the Web MIDI API
The original release of the Web MIDI API specification is actually 3 years old. It was first released in October 2012. However, without a browser vendor implementing the standard, it wasn’t of much concrete use. It took version 43 of Google Chrome to finally have an official widespread implementation. For a few versions before that, you could manually enable it with chrome://flags/#enable-web-midi but is is now activated by default. Opera has had support since version 32. According to caniuse.com, there is nothing on the horizon for other browsers.
If you are using the Electron framework, you should be good to go. Users of version 0.12 of NW.js will need to include "chromium-args": "--enable-web-midi" in their package.json file for MIDI support to kick in.
Getting ready
Before we start, we urge you to verify your setup by trying out one of the few online synthesizers already available. The first thing to do is to plug in your MIDI keyboard (or other MIDI controller). Then you should start (or restart) your browser. Once this has been done, try Heisenberg, WebSynths, Viktor NV-1 or MIDI Synth. If everything went well, you should hear the notes you are playing on your physical keyboard.
Amazingly enough, you can even play more than one synths at the same time by opening them in different windows. Wow!
Now, before we start writing some code, it might be a good idea to decide if you should use the Web MIDI API directly or if it’s worth it to use a library to make things a bit simpler. While the Web MIDI API is relatively simple, it is also relatively low-level.
To give you an idea, here is an example of the code needed to play a 3rd octave C for 1 second on channel 3 of the first available device.
|
1 2 3 4 5 6 7 8 9 10 11 12 13 14 15 16 17 18 19 20 21 22 23 24 25 26 27 28 29 30 31 32 33 34 35 36 37 38 39 40 41 42 |
// Check if the Web MIDI API is supported by the browser if (navigator.requestMIDIAccess) { // Try to connect to the MIDI interface. navigator.requestMIDIAccess().then(onSuccess, onFailure); } else { console.log("Web MIDI API not supported!"); } // Function executed on successful connection function onSuccess(interface) { var noteon, noteoff, outputs = []; // Grab an array of all available devices var iter = interface.outputs.values(); for (var i = iter.next(); i && !i.done; i = iter.next()) { outputs.push(i.value); } // Craft 'note on' and 'note off' messages (channel 3, note number 60 [C3], max velocity) noteon = [0x92, 60, 127]; noteoff = [0x82, 60, 127]; // Send the 'note on' and schedule the 'note off' for 1 second later outputs[0].send(noteon); setTimeout( function() { outputs[0].send(noteoff); }, 1000 ); } // Function executed on failed connection function onFailure(error) { console.log("Could not connect to the MIDI interface"); } |
That’s quite a bit of code for what is a relatively simple thing. The worst part is having to figure out the byte values for a note on event on channel 3 (0x92) and the equivalent note off (0x82). Unfortunately, if you stick with the bare Web MIDI API, this is what you will have to do.
By the way, receiving MIDI messages is just as equally convoluted…
Faced with this situation, I decided to write a library to make all this simpler. The library is called WebMidi.js. Here is how you would do the same thing using the library:
|
1 2 3 4 5 6 7 8 9 |
WebMidi.enable(function(err) { if (err) { console.log("Could not enable WebMidi."); } WebMidi.outputs[0].playNote("C3", 3, {duration: 1000}); ); |
For archival purposes, here is the same code for version 1.x of WebMidi.js (documentation for version 1.x will remain available) :
|
1 2 3 4 5 6 7 8 9 10 11 |
WebMidi.enable( function() { WebMidi.playNote("C3", 1, 1000, WebMidi.outputs[0], 3); }, function(error) { console.log("Could not enable WebMidi."); } ); |
If you agree that it’s more fun this way, I invite you to download WebMidi.js from GitHub, or to install it from Bower or NPM. Check out the README file on GitHub for installation details.
As you may have guessed, from this point on, the code in this tutorial takes it for granted that you have WebMidi.js installed.
There are other alternatives to the Web MIDI API. If you are developing your project in NW.js, Electron or Node.js, you could use the midi NPM module. This module is a wrapper for the very powerful and cross-platform (Mac, Linux & Windows) RtMidi C++ library.
Sending Messages
What is so exciting about MIDI support is the amount of access it grants you. You can control any external hardware MIDI device but also any MIDI-compatible software endpoints. In terms of physical computing, what’s perhaps the most exciting is the ability to talk to other popular physical computing frameworks. For example, interfacing with Pure Data or Max is super easy.
So, how can we send commands to MIDI devices? Well, first you need to identify the target MIDI channel you want to send the command to. You can do that by printing out all the available output channels.
|
1 2 3 4 5 6 7 8 9 |
WebMidi.enable(function(err) { if (err) { console.log("Could not enable WebMidi."); } console.log(WebMidi.outputs); ); |
If you look at Chrome’s debugging console, you should see an array of all available outputs. Obviously, you need to plug in your devices first. In my case, I have 5 available output devices (0, 1, 2, 3 and 4) and the device at position 3 is my Axiom Pro 25. 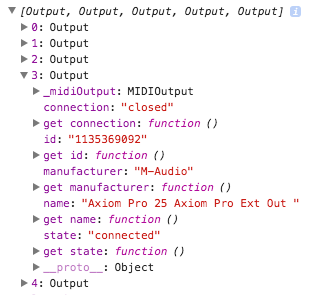
Now that you know how to identify the outputs available on your system, the second thing you need to know is the type of data you wish to send. MIDI messages can be broken down into two groups: messages sent to a single channel and system messages sent globally. The first group is the most common. Here is a list of channel-related MIDI commands:
- noteon: play a note;
- noteoff: stop playing a note;
- keyaftertouch: alter the pressure value associated with a specific note;
- controlchange: send control information (modulation, volume, pan, etc.);
- channelmode: send channel status (all sounds off, reset, all notes off, etc.);
- programchange: change to a specific patch/program number;
- channelaftertouch: alter the global pressure associated with a channel;
- pitchbend: bend the pitch of the sound by a certain amount.
Let’s look at how to send common messages: note on, note off, controlchange, channelaftertouch and pitchbend. As you will see, all these commands have their own dedicated function:
|
1 2 3 4 5 6 7 8 9 10 11 12 13 14 15 16 17 18 19 20 21 22 23 24 25 26 27 28 29 30 31 |
WebMidi.enable(function(err) { if (err) console.log("Could not enable WebMidi"); var output = WebMidi.outputs[0]; // Playing a note (note number 60, all channels, half velocity) output.playNote(60, "all", {velocity: 0.5}); output.playNote(60, "all", {velocity: 0.5, duration: 1000}); // duration 1 sec. // Use note name and octave (3rd octave C, on all channels) output.playNote("C3"); // Specifying a channel (3) output.playNote(60, 3); // Stopping a playing note output.stopNote(60); // Send control change value 127 to controller 1 (modulation) on all // channels. output.sendControlChange(1, 127, "all"); // Send channel aftertouch (half pressure) to the 3rd output device, on // channel 8 output.sendChannelAftertouch(0.5, 8, {pressure: 0.5}); // Send pitch bend (between -1 and 1) output.sendPitchBend(-0.5); ); |
As you can see, it’s very straightforward. Also, it works in the exact same way for the other channel-related send commands (channel mode, program change, etc.) which all have equivalent functions ( sendChannelMode() , sendProgramChange() , etc.).
There is a second group of commands made up of system-global commands (sysex, timecode, clock, etc.). Advanced users might need them but if you are starting with MIDI, you probably will not use them. Having said that, they also work in the exact same way. The only difference is that you do not need to specify a channel for them.
Receiving Messages
Perhaps even more exciting than sending MIDI commands is the ability to let your web page be controlled by an external hardware or software MIDI device. To allow that, you simply need to register a function to be fired when specific MIDI events occur. Here are examples of doing that for common messages:
|
1 2 3 4 5 6 7 8 9 10 11 12 13 14 15 16 17 18 19 20 21 22 23 24 25 26 27 28 |
WebMidi.enable(function(err) { if (err) console.log("WebMidi could not be enabled"); var input = WebMidi.inputs[0]; // Listening for a 'note on' message (on all channels) input.addListener('noteon', "all", function(e){ console.log(e); } ); // Listening for a 'note on' message (on channel 1 only) input.addEventListener('noteon', 1, function(e){ console.log(e); } ); // Listening to other messages works the same way input.addListener('noteoff', "all," function(e){ console.log(e); } ); input.addListener('pitchbend', "all" function(e){ console.log(e); } ); } ); |
Obviously, wherever an anonymous function is used in the above code ( function(e){ console.log(e); }), you could call your own function or do whatever you please.
Surely, if you can add event listeners, you should also be able to check for their presence and remove them if needed. You can do that as such:
|
1 2 3 4 5 6 7 8 9 10 11 12 13 14 15 16 17 18 19 |
WebMidi.enable(function(err) { if (err) console.log("Could not enable WebMidi."); var input = WebMidi.getInputByName("nanoKEY2"); // You can also check and remove event listeners input.addListener('pitchbend', "all", test); console.log("Has event listener: ", input.hasListener('pitchbend', "all", test) ); input.removeListener('pitchbend', "all", test); console.log("Has event listener: ", input.hasListener('pitchbend', "all", test) ); function test(e) { console.log(e); } } ); |
If you need to check for the presence of event listeners or be able to remove them later, you need to keep a reference to the callback function that has been assigned. Therefore, you shouldn’t use an anonymous function in such cases. In the example above, we simply assign the test() function which we are later able to use to with hasListener() and removeListener() .
Conclusion
This pretty much rounds it up. While we have looked at the most popular scenarios, you should be aware that the WebMidi.js library offers quite a bit more. For all details, check out the full API documentation which is available online or the in the download package (in the docs folder).
I hope this tutorial has proven useful and, as always, I invite you to participate by leaving comments below. Cheers!
The synthesizer image is from Bernd Sieker and is used in accordance with the Creative Commons license (CC BY-SA 2.0).