


Interactivité tangible en JavaScript: une introduction
Vous êtes prêts à tirer parti de vos connaissances en JavaScript pour créer votre premier projet d’interactivité tangible ? Vous êtes à la bonne place.
Cet article trace un portrait général de ce qui peut être fait dans le monde du physical computing à l’aide de JavaScript et des technologies du web. Il vous dirigera aussi vers plusieurs outils, bibliothèques, cadres de travail, appareils et tutoriels qui vous aideront à commencer. Allons-y!
Comme vous pourrez le voir sur ce diagramme, un projet d’interactivité tangible peut généralement être divisé en trois parties principales: les entrées, le traitement et les sorties. Les entrées (intrants) représentent l’information qui entre dans le système depuis l’environnement. Les sorties (extrants) représentent la capacité du système à agir sur son environnement. Le traitement fait référence à la logique du système et à tout ce que le système doit faire pour transformer les entrées en sorties.
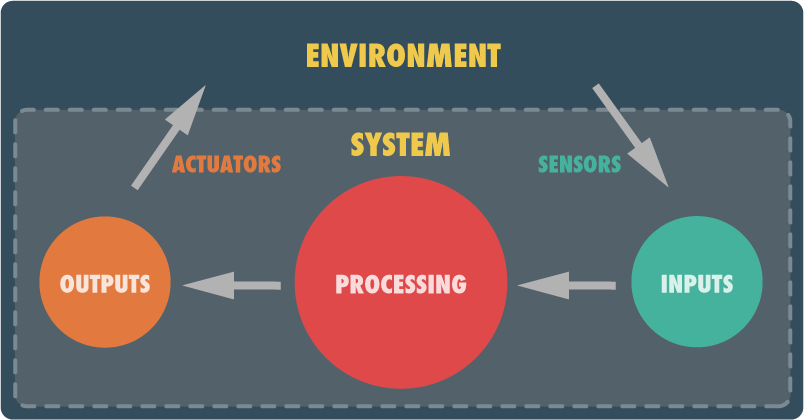
Si on utilisait l’humain comme analogie, les capteurs seraient nos 5 sens, les actuateurs seraient nos muscles et notre cerveau serait en charge du traitement. En toute logique, j’utiliserai donc ce découpage pour présenter la quincaillerie logicielle et matérielle dans cet article. Commençons avec le gros point rouge.
Processing
This is where most of the programming will take place. Basically, you take whatever inputs are fed into your system and turn them into the desired outputs you want. Here’s what you typically need for that:
- a programming language
- a platform & runtime environment
- a development environment
Obviously, the programming language is JavaScript. However, depending on the platform you want to deploy to, the runtime environment will change. If you want to deploy to mobile devices, you should look into Cordova (PhoneGap) and Sencha Touch. If you want to deploy to smaller, perhaps embedded devices, you should look at micro-controllers that natively support JavaScript: Tessel and Espruino. Other alternatives would be micro-controllers that support Node.js such as the Raspberry PI. In the case of this article, I will focus on projects driven by desktop/laptop-based computers. In such an environment, you have 3 main alternatives:
- If you only need visual output, you can simply use the good ol’ browser and make it fullscreen. However, if you are here, I suspect you want to do more.
- If you do not need visual output but want access to external devices, you should use Node.js or its openly governed twin io.js. There are hundreds of node-compatible modules that will let you access eveything from robots to MIDI-devices and everything in between.
- If you need both (which is most likely the case), I urge you to try out NW.js. NW.js (previously node-webkit) lets you create native desktop applications using HTML, CSS and JavaScript. These applications get full access to the local file system and to local resources. Even better, it lets you access any and all node-compatible modules. You get the best of both worlds.
As far as I’m concerned, NW.js is one of the top assets you could have in your physical computing toolbox. To get started with NW.js, I suggest you read Creating a Native App with HTML, CSS and JavaScript.
Another asset I urge you to look into is a good IDE (integrated developement environment). Obviously, you could simply use a text editor. However, an IDE will offer productivity-boosting features that you should not live without: syntax highlighting, code inspection, code completion, refactoring, debugging, etc. I personally use WebStorm. It is a great IDE that has built-in NW.js support.
Now that the processing side is covered, let’s look at inputs.
Inputs
Physical computing implies that you will need to gather input from the environment, typically with something else than the mouse or keyboard. Let’s look a different ways to sense the real world.
One of my personal favorites is the webcam. NW.js let you easily access a webcam through the getUserMedia API. Once you have a video feed coming in, you can do amazing stuff. For example, you could:
- perform face detection or substitution with clmtrackr;
- detect object or lines with jsfeat;
- detect features, track colors or tag people with tracking.js;
- grab pictures or detect motion.
The getUserMedia API also grants you access to microphone input. Together with the WebAudio API, this can be used to detect the pitch (frequency) and the volume (amplitude) of live sound input. A good place to start is the dart-mic library.
The webcam and mic inputs are pretty obvious. What else can we use ? Well, a set of devices I often use for input gathering are the Phidgets. These sensing boards will give you access to a wide range of information such as:
- distance, proximity, motion
- pressure, force, compression, vibration
- temperature, air pressure
- touch, bending
- acceleration, GPS position, rotation
- magnetism, light, pH
- voltage, current
- etc.
These sensors are super easy to use and will let you sense pretty much anything you need. They hook up to the general-purpose Phidget Interface Kit which connects to your computer via USB. You can use them in NW.js by simply installing the phidgets module available on npmjs.org. The Phidget Interface Kit also allows you to connect up to 8 binary inputs such as switches (mat switches, light switches, tilt switches, magnetic switches or any custom-made switch).
Speaking of switches, if all you need is to grab input from switches, you could use a keyboard emulator to do that even more easily. For more information on this topic, read the article Switches, keyboard emulators & JavaScript.
Outputs
The only thing that is missing from your project is its ability to insert itself into the real world. The easiest way is, obviously, to use the video output from your computer. Simply make your application fullscreen by modifying its package.json file and you have a clean video output to use. You can then display this output on one or more monitors (many graphic cards have dual or triple output nowadays) or even project it on regular flat surfaces or on objects. A nifty library that comes to mind when speaking of projections is Maptastic. This library lets you perspective-correct anything on a web page (video, canvas, or any DOM-element) so that it matches the surface upon which it is projected.
The second obvious output are the speakers. While the WebAudio API handles sound playback without problems, you probably should use a library to make the experience easier. Some suggestions:
What else ? Well… how about making things move ? Our good friends at Phidgets Inc, sell a line of linear actuators that you could use. Linear actuators are piston-like devices that can push or pull along their axis. You can easily control them with a servo-controller. There are various ways to control the servo from JavaScript. One of them would be to use the johny-five robotics library and a device like the Arduino or the Raspberry PI. Another way, would be for you to support 😉 the addition of the servo module to the phidgets Node library (I have not had time to do it yet…).
You could also do the same with rotating motors (stepping motors or continuous movement). Again, you will need a motor-controller that you will control from a Node-compatible module. Another nice thing to try out is a relay. A relay is a switch that you can control from your code. It would allow you to power up or power down any electric device. You can control your relay by plugging it to a Phidget Interface Kit and using the Node-compatible phidgets module.
Anything else ? Well, it could be nice to control other types of devices. Depending on what you want to do, there are various protocols you could use to talk to external devices:
- TUIO: for various interaction devices (particularly multitouch devices)
- OSC (Open Sound Control): compatible with tons of hardware devices and software applications
- MIDI: for musical instruments, lighting and show control
There are about a million other devices we could talk about here. You want to control robots ? Use Cylon.js. You want to use a Kinect sensor. Use the kinect Node module. You want to… well you get the idea. In the coming months, you will see more and more tutorials on this site pertaining to specific devices but for now, that’s it.
The nice header image has been taken by Dmitry Baranovskiy and is used here under the terms of the Creative Commons Attribution 2.o Generic license.