

Using Phidgets sensors in JavaScript
In a typical physical computing project, you will need to gather input from the real world. For instance, you may need to sense distance to an object, vibration level, gps position, amount of light, air pressure, force applied, etc. How can you bring that external information in your JavaScript-based physical computing project? One of the easiest way is probably to use a sensor board made by Phidgets Inc. This article will show you precisely how to do that.
Attention: during the summer of 2017, Phidgets Inc. updated it’s API in a major, non-backwards-compatible way. The new version (Phidget22) is NOT compatible with the module used in this article. If you want to use the new version, please read our updated article titled: Using the new Phidget22 JavaScript API with NW.js.
Phidgets Inc. makes a wide variety of sensors that can easily be interfaced with JavaScript. The sensors will allow you to answer questions about the project’s environment such as:
- Did the user touch something?
- Is the object correctly oriented in space?
- How strongly is the button pressed?
- How far away is the user?
- How much has my interface been bent ?
- etc.
The possibilities are endless. Furthermore, what is great about the Phidgets analog sensors is that they all work in the same way. Once you know how to use one, you pretty much know how to use them all. In this tutorial, we will create a native application that can access input from any Phidgets analog sensor. For the purpose of this tutorial we will use a force sensor. This sensor will tell us how hard the user is pressing it. However, feel free to use any other Phidgets analog sensor. As I said, they all work in the same way.
Caveat: as often on the TangibleJS site, this tutorial will show you how to bring in sensor inputs to a NW.js-based project. The instructions below will not work for a regular, sandboxed web page hosted on a web server. To know more about setting up a NW.js project, please check out my other tutorial titled: Creating a Native App with HTML, CSS and JavaScript.
All sensors are designed to hook up to an I/O board. This board will act as a bridge between the sensor(s) and the computer. There are various I/O boards, varying in form factor and number of inputs and outputs. To get started, a versatile board such as the PhidgetInterfaceKit 8/8/8 (80$) is perfect. This is the one we will use in this tutorial. 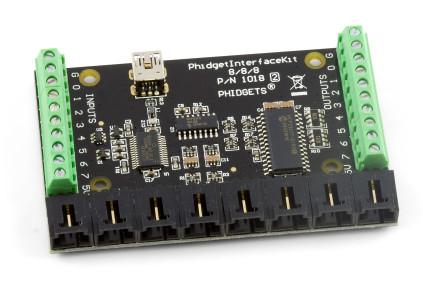 The 8/8/8 can be used to gather the input of up to 8 analog sensors. It can also accomodate an additional 8 digital inputs (such as switches) and 8 CMOS outputs. While the I/O boards are not cheap (between 50$ and 125$), they make it up in simplicity.
Setting up the hardware and drivers
To get started, the first thing you need to do is install the drivers for the Phidgets. You can get them for Mac OS X, Linux and Windows on the Drivers page of the phidgets.com website. After installation, you will be able to access a control panel providing information about any connected I/O boards. On Mac, the control panel is accessible in the system preferences: 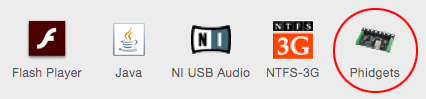 On Windows, you can access it by double-clicking its icon in the system tray:
 ![]()
The Linux driver does not offer a graphical user interface. For OS-specific installation and configuration instructions, please check out the Phidgets Linux page.
Once this is done, plug the I/O board to the USB port of your computer. It should now show up in the control panel: 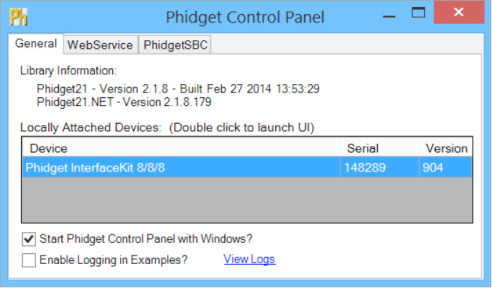 If you double-click the I/O board’s name, you will be taken to a screen for this specific device. On this screen, you can view the status of all inputs and outputs. For example, you can see below that an analog sensor has been connected to input #2 and that its current value is 416.
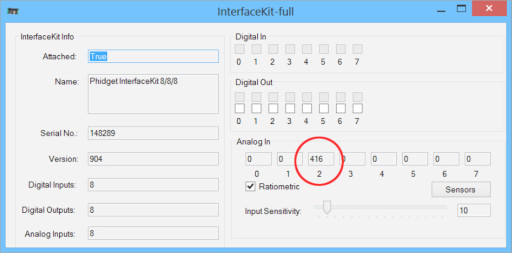
No matter what type of analog sensor you use, the reported value will always be between 0 (minimum) and 1000 (maximum).
Let’s now see if everything is working right. Using the supplied red, black and white cable, plug in your sensor to any of the 8 analog inputs (labeled 0 through 7). For example, here is a force sensor hooked up to input number 6: 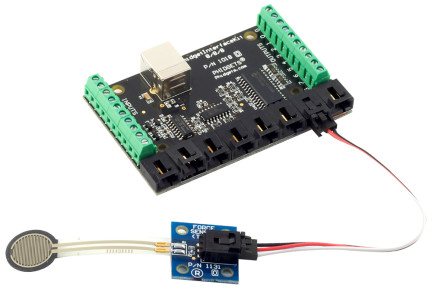 If you play with the sensor, you should now see the value of the corresponding input change in the control panel window. The last thing we need to do is activate the Phidget Webservice. The Webservice will allow JavaScript to connect to the device via a network socket connection. Simply press Start to activate it.
 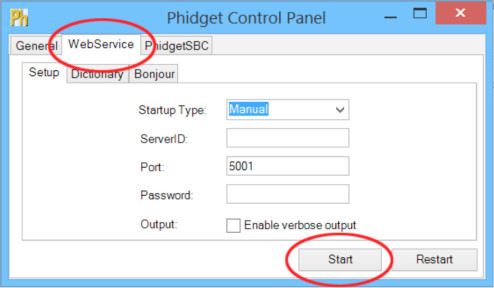 What is nice about this architecture is that you can control devices connected locally (the usual scenario) or devices connected to a remote computer anywhere on the internet. In this tutorial we will use a locally-connected device.
Setting up the project and libraries
Now that the we know the hardware is working, we need to hook it up into our project. As was stated earlier, we will use NW.js to create a desktop application from HTML, CSS and JavaScript. Using NW.js will grant us access to the DOM and, more importantly, to all Node.js functionalities. This is necessary since we will need a Node.js module to talk to the Phidget Webservice.
If you are not familiar with NW.js, I urge you to read my other tutorial called Creating a Native App with HTML, CSS and JavaScript before moving on.
First, let’s create a folder to put the project in. Inside that folder, create a package.json file to inform NW.js of the options we wish to use. Let’s keep its content super simple for now:
|
1 2 3 4 |
{ "main": "index.html", "name": "phidgets-experiment" } |
This gives the project a name (lowercase, no spaces) and tells NW.js to open index.html when the application starts. You should now add the aforementioned index.html file to the folder. A simple HTML file with a single div will do:
|
1 2 3 4 5 6 7 8 9 10 11 12 13 14 15 16 17 18 19 20 21 22 |
<!DOCTYPE html> <html> <head lang="en"> <meta charset="UTF-8"> <title>Phidgets Experiment</title> <style> #input { background-color: red; width: 100%; height: 50px; } </style> <script src="script.js"></script> </head> <body> <div id="input"></div> </body> </html> |
As you might have noticed, this HTML file loads a JavaScript file. Later on in this tutorial, we will put our code in this file. You can create script.js and leave it empty for now. Our file structure is now ready. The only thing we are missing is the phidgets Node module. There are two ways to install it.
- If you are familiar with the Terminal (Mac, Linux) or the PowerShell (Windows), this is the simplest way to install it.
To do that, you will need to have Node.js installed. If that’s not the case, install it first.
Simply cd to the project directory and issue : npm install phidgets. This will create a node_modules subfolder and place the phidgets module inside it.
 Do not worry about the warnings, the module has indeed been installed correctly. The warnings are merely informing you that our
package.json file is missing a field optional fields.
Do not worry about the warnings, the module has indeed been installed correctly. The warnings are merely informing you that our
package.json file is missing a field optional fields.
- If you are not familiar with the Terminal or do not wish to install Node.js, you can install the module manually. First, create a node_modules folder inside your project folder. Then create a phidgets folder inside the node_modules folder. Then download the phidgets module and unzip it. Take all the files inside nodePhidgets-master and move them to the phidgets folder you just created.
In the end, your project folder should look something like this: 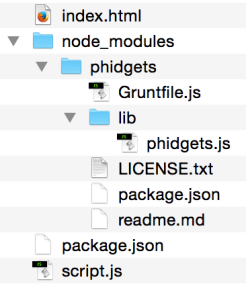 We are now ready to edit the
script.js file.
We are now ready to edit the
script.js file.
Let’s write some code!
Fire up your favorite web editor and open the script.js file. Inside, paste the following code:
|
1 2 3 4 5 6 7 8 9 10 11 12 |
window.onload = function() { var phidgets = require('phidgets'); var pik = new phidgets.PhidgetInterfaceKit(); pik.on('sensor', function(emitter, data) { console.log('Sensor: ' + data.index + ', value: ' + data.value); }); pik.open(); }; |
This code uses Node’s require() function to fetch the library and to create a new instance of the PhidgetInterfaceKit object. It then adds a listener for the sensor event. The sensor event is triggered each time the state of any sensor input changes. Data about the event (such as the input number and the value) is placed inside the data variable. Finally, it calls the open() function of the PhidgetInterfaceKit object to open a connection to the sensor. Let’s try to run it to see the messages appear in the console. If you have read Creating a Native App with HTML, CSS and JavaScript you know that you can run the code by placing the NW.js files in your project folder and double-clicking nw, nw.exe or nw.app(depending on your platform).
Another (simpler) way to run the code is to use the Terminal/PowerShell. Simply call nw while passing it the path to the folder containing the project. On my Mac, it looks like this:
Obviously, nwjs has been added to my PATH system variable.
If you fiddle with your sensor, you should see messages appearing in the console. Obviously, you first need to open the console by clicking on the gear icon: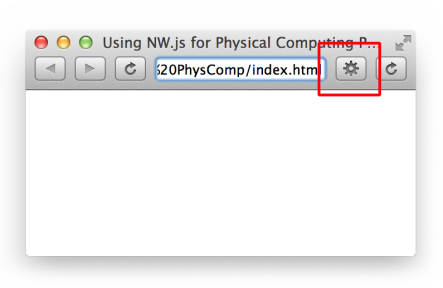 To make things a little more visually appealing, let’s vary the width of the
div according to the input from the sensor. To do that, let’s add a second line inside the listener function:
To make things a little more visually appealing, let’s vary the width of the
div according to the input from the sensor. To do that, let’s add a second line inside the listener function:
|
1 2 3 4 5 6 7 8 9 10 11 12 13 |
window.onload = function() { var phidgets = require('phidgets'); var pik = new phidgets.PhidgetInterfaceKit(); pik.on('sensor', function(emitter, data) { console.log('Sensor: ' + data.index + ', value: ' + data.value); document.getElementById('input').style.width = (data.value / 10) + '%'; }); pik.open(); }; |
This new line modifies the width of the div using the value received from the sensor. Note that we have to divide the value by ten since sensor values are between 0 and 1000. Beware that the sensor event is triggered by all sensor inputs. So, if you had more than one sensors connected, the result might not be what you expect. That’s why we usually filter by using the input number:
|
1 2 3 4 5 6 7 8 9 10 11 12 13 14 15 |
window.onload = function() { var phidgets = require('phidgets'); var pik = new phidgets.PhidgetInterfaceKit(); pik.on('sensor', function(emitter, data) { if (data.index === 6) { console.log('Sensor: ' + data.index + ', value: ' + data.value); document.getElementById('input').style.width = (data.value / 10) + '%'; } }); pik.open(); }; |
In this case, the div ‘s width will only be altered if the sensor event happened on the sensor connected to input #6. Isn’t it cool? With just a few lines of code, you can have a real-life sensor sending data to your HTML/CSS/JavaScript-based native application! Obviously, changing the size of a div is not particularly spectacular. However, once the data is available in JavaScript, you can do pretty much anything you want. For instance, you could use the sensor data to navigate a ThreeJS 3D scene or to dynamically generate sounds and effects using DSP.js.
Going further
If you want to go further with the phidgets Node.js module, you can check out the package’s Getting Started instructions and the full API documentation. The Phidgets website also contains valuable hardware-related information such as their Analog Input Primer.
Download the source
If you wish, you can download a copy of the source files used in this tutorial.