

Using the new Phidget22 JavaScript API with NW.js
During the summer, Phidgets inc. performed a complete overhaul of their API. This new version of the API (22) is, unfortunately, not backwards compatible. This means that our previous article on using Phidgets with NW.js is not applicable to the new API. The time has come for an updated article. So, here it is.
Foreword
In general, a software update, is a good thing. However, with the new Phidget22 API, changes are so major that existing code will have to be updated in a big way.
The introduction of the new API also renders my own phidgets Node.js module obsolete. This module was created for the (now legacy) Phidget21 API and will not work under the new drivers and API. All is not lost though… With version 22, Phidgets Inc. finally released an official JavaScript/Node.js version of their API.
We have encountered quite a few bugs with the early releases of the Node.js module. But, lately, things seem to have stabilized. I’m not sure if the module should be considered production-ready but it will be good enough for this article.
Installation
Before you can get started, you need to install the driver and control panel. To do so, please consult the instructions for your target platform. Supported platforms are: macOS, iOS, Linux and Windows (32-bit & 64-bit).
To confirm the installation went fine, you can open the Phidget Control Panel. On Windows you can launch it by clicking the ![]() icon in the taskbar. On Mac, it’s an application and can be found in the Applications folder.
icon in the taskbar. On Mac, it’s an application and can be found in the Applications folder.
Note that there is no control panel on Linux.
If you plug in a few devices, they should show up in the Phidgets tab. As you will see, the layout is different from the previous version. What is not obvious at first sight, is that you can double-click on any input or output to view details about that specific input/output in a new window.

In the image above, you can see the good old PhidgetInterfaceKit 8/8/8. With this device, you get 8 digital inputs, 8 digital outputs and 8 analog inputs. One thing that is new, is that the analog inputs are reported twice: once as Voltage Input and once as Voltage Ratio Input. Voltage input reports the actual voltage read on that input (between 0 and 5 volt). Voltage ratio takes into account the sensor’s type and converts the voltage to a value that’s appropriate for each specific sensor. For example, if you are using a Sharp distance sensor, the value will be reported in centimeters (more on that later).
Configuration
To use the new Phidget22 API within a web-platform-based project (such as NW.js), we have two options.
- The first option is to use the front-end JavaScript approach, which relies on web sockets.
- The second option is to use the Node module approach.
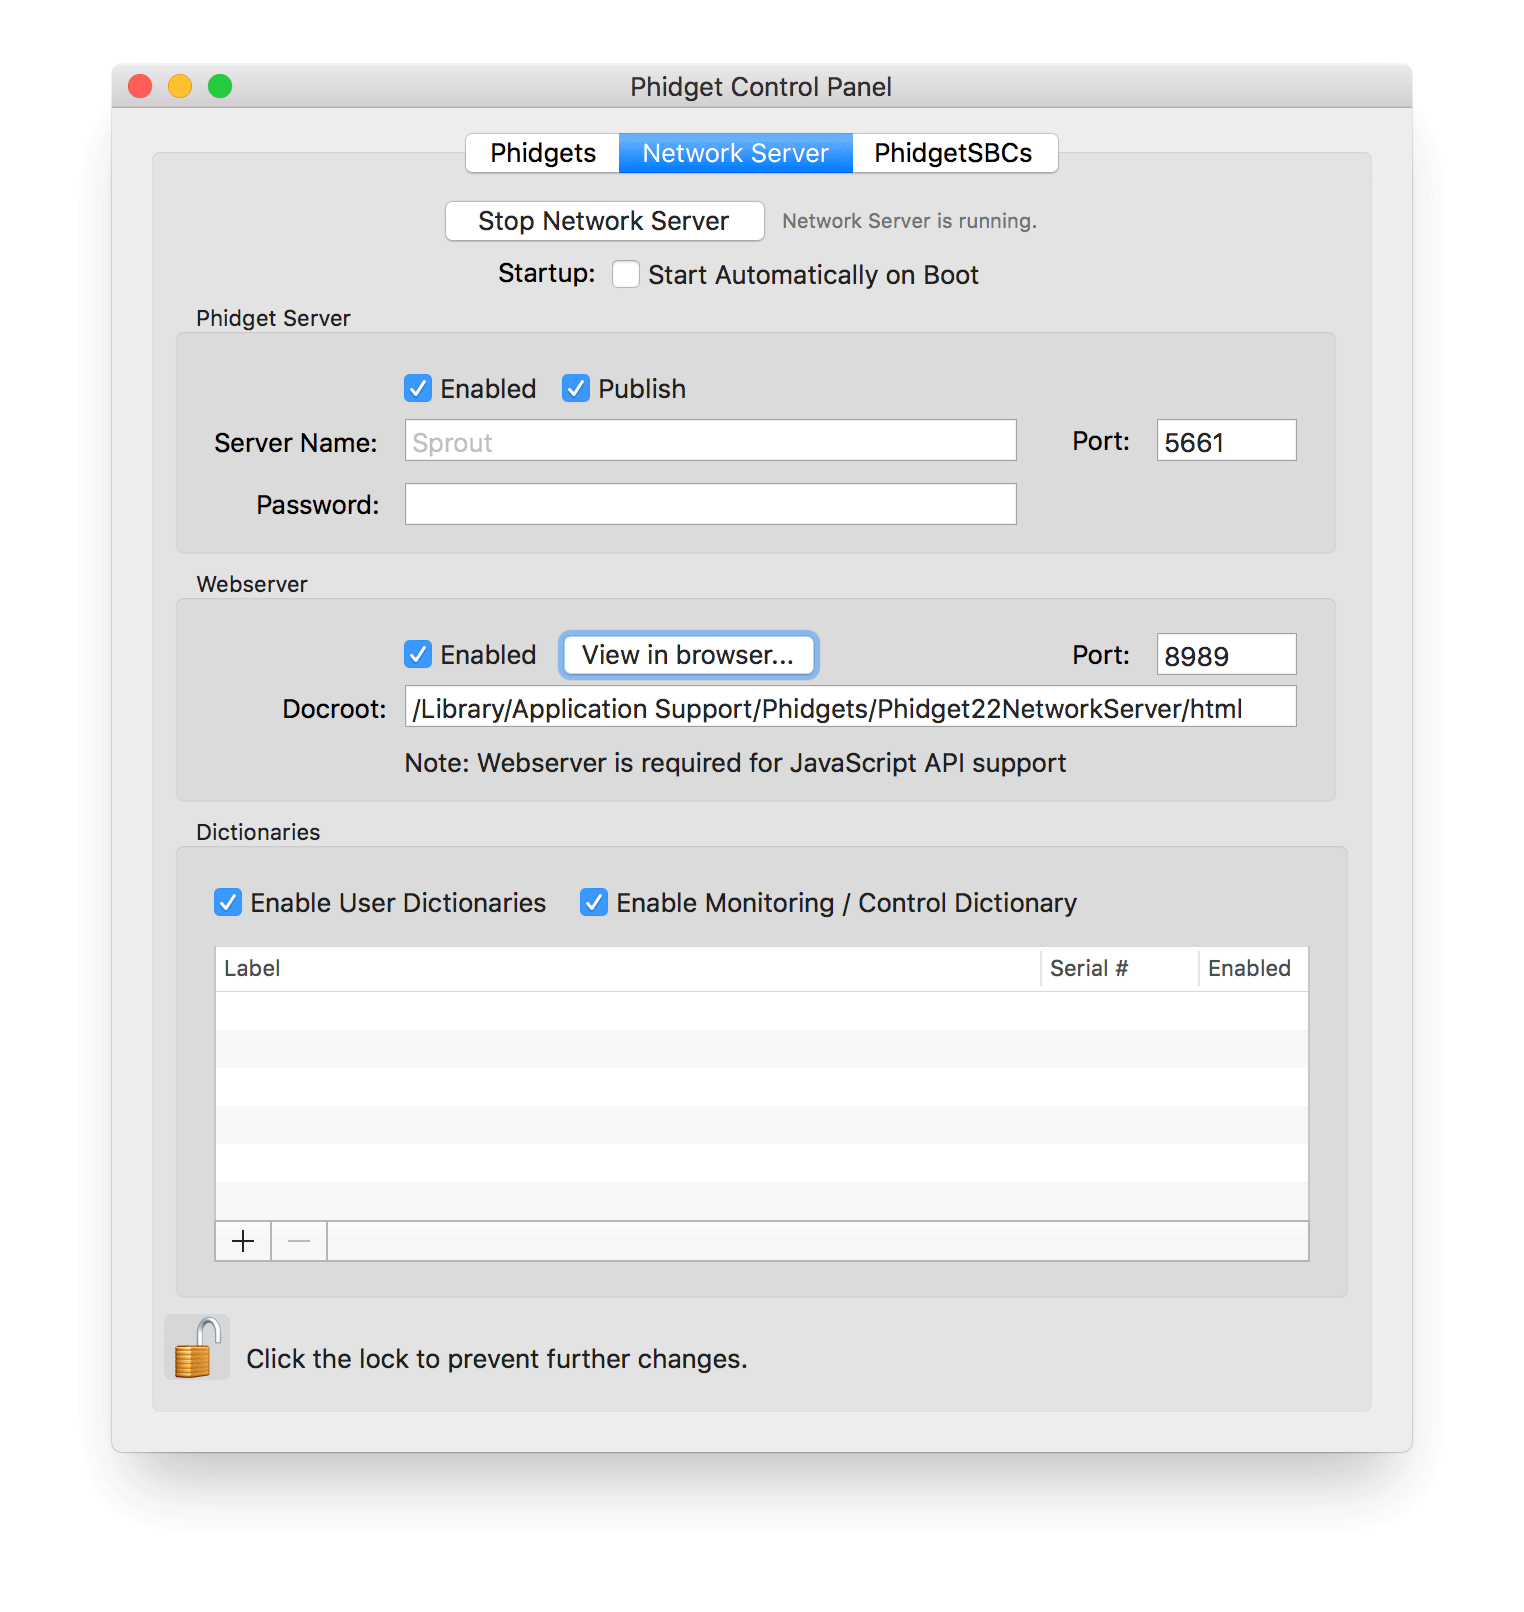
In both scenarios, the Phidget Network Server needs to be running. You can start it in the second tab of the Phidget Control Panel:
If you want to use the front-end approach, you will also have to start the webserver in that same tab.
Note: if you are on Linux, the configuration of the Phidget Network Server is done via a configuration file (which can also be used in macOS and Windows).
After considering both options, we opted for the Node module approach as it does not require a web server to host the front-end websocket API. However, you may still want to enable the web server as it provides another way to view the phidgets’ statuses.
If you open a browser and go to http://localhost:8989, you should be able to view all connected devices in a way similar to what we can see in the control panel:
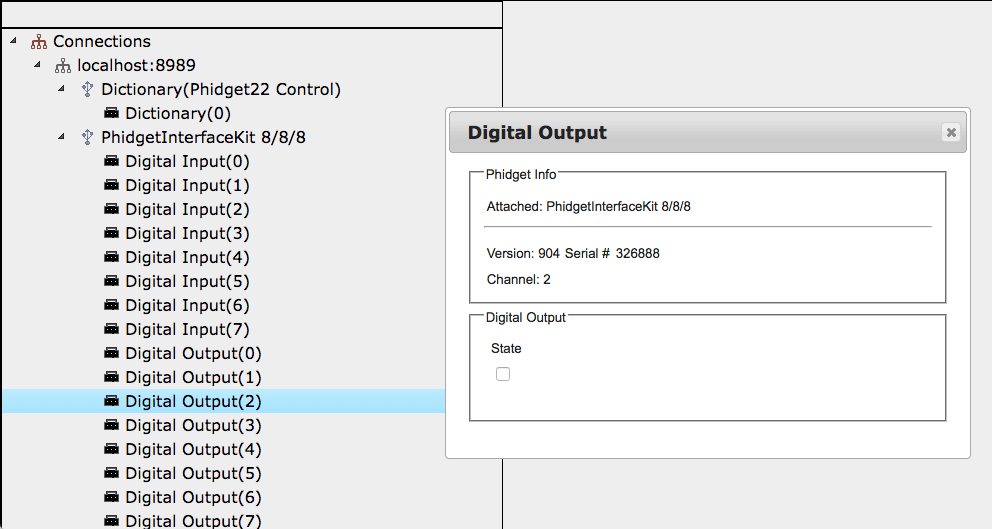
Note: to open the window of one of the inputs or outputs, you need to double-click on that input or output.
Creating a project
Now that the hardware and server are ready, we will create our NW.js project. This involves creating a folder inside which we will need a package.json file, an index.html file and the typical script.js file. This process is detailed in another one of our articles titled Creating a Desktop App with HTML, CSS and JavaScript.
To use the new API, we need to install the Node module. To do so, you need to fire up your Terminal (macOS, GNU/Linux) or PowerShell (Windows). From the command line, go to your project’s directory and issue the following command:
|
1 |
npm install phidget22 --save |
This will download the module and put it inside the node_modules folder at the root of your project. It will also download any dependencies and put them in that same folder.
By using --save we are specifying that this module is a dependency of our project. Therefore, it will be added to the package.json file’s dependencies.
Coding Away
Now that the files and module are ready, let’s look at some code. Open up your script.js file and import the phidget22 module. Remember that, in NW.js, we must use the require directive from the nw namespace:
|
1 |
const jPhidget22 = nw.require("phidget22"); |
As a convenience, we will also automatically open Chromium’s development tools:
|
1 |
nw.Window.get().showDevTools(); |
Then, we need to open a connection to the Phidget Network Server that we started earlier on. If you are using the default port value (5661), the following code should do that for you:
|
1 2 3 4 5 6 7 8 9 10 |
window.addEventListener('load', function () { console.log("Page loaded"); let pServer = new jPhidget22.Connection('phid://localhost:5661'); pServer.connect() .then(start) .catch(err => console.log(err)); }); |
Note: we are listening for the “load” event in case our page relies on front-end libraries.
The start() function is called upon a successful connection. Inside that function, we will add the code to talk to a specific sensor or actuator. This is where the API has changed. A lot. The Phidget22 API introduces the, somewhat ambiguous, notion of channels. A channel is an object that allows us to interact with an input or output (local or remote).
Let’s look at an example. Let’s say want to use a Sharp distance sensor. The sensor is connected to an analog input (a.k.a. voltage input) on a PhidgetInterfaceKit 8/8/8. Where do we start?
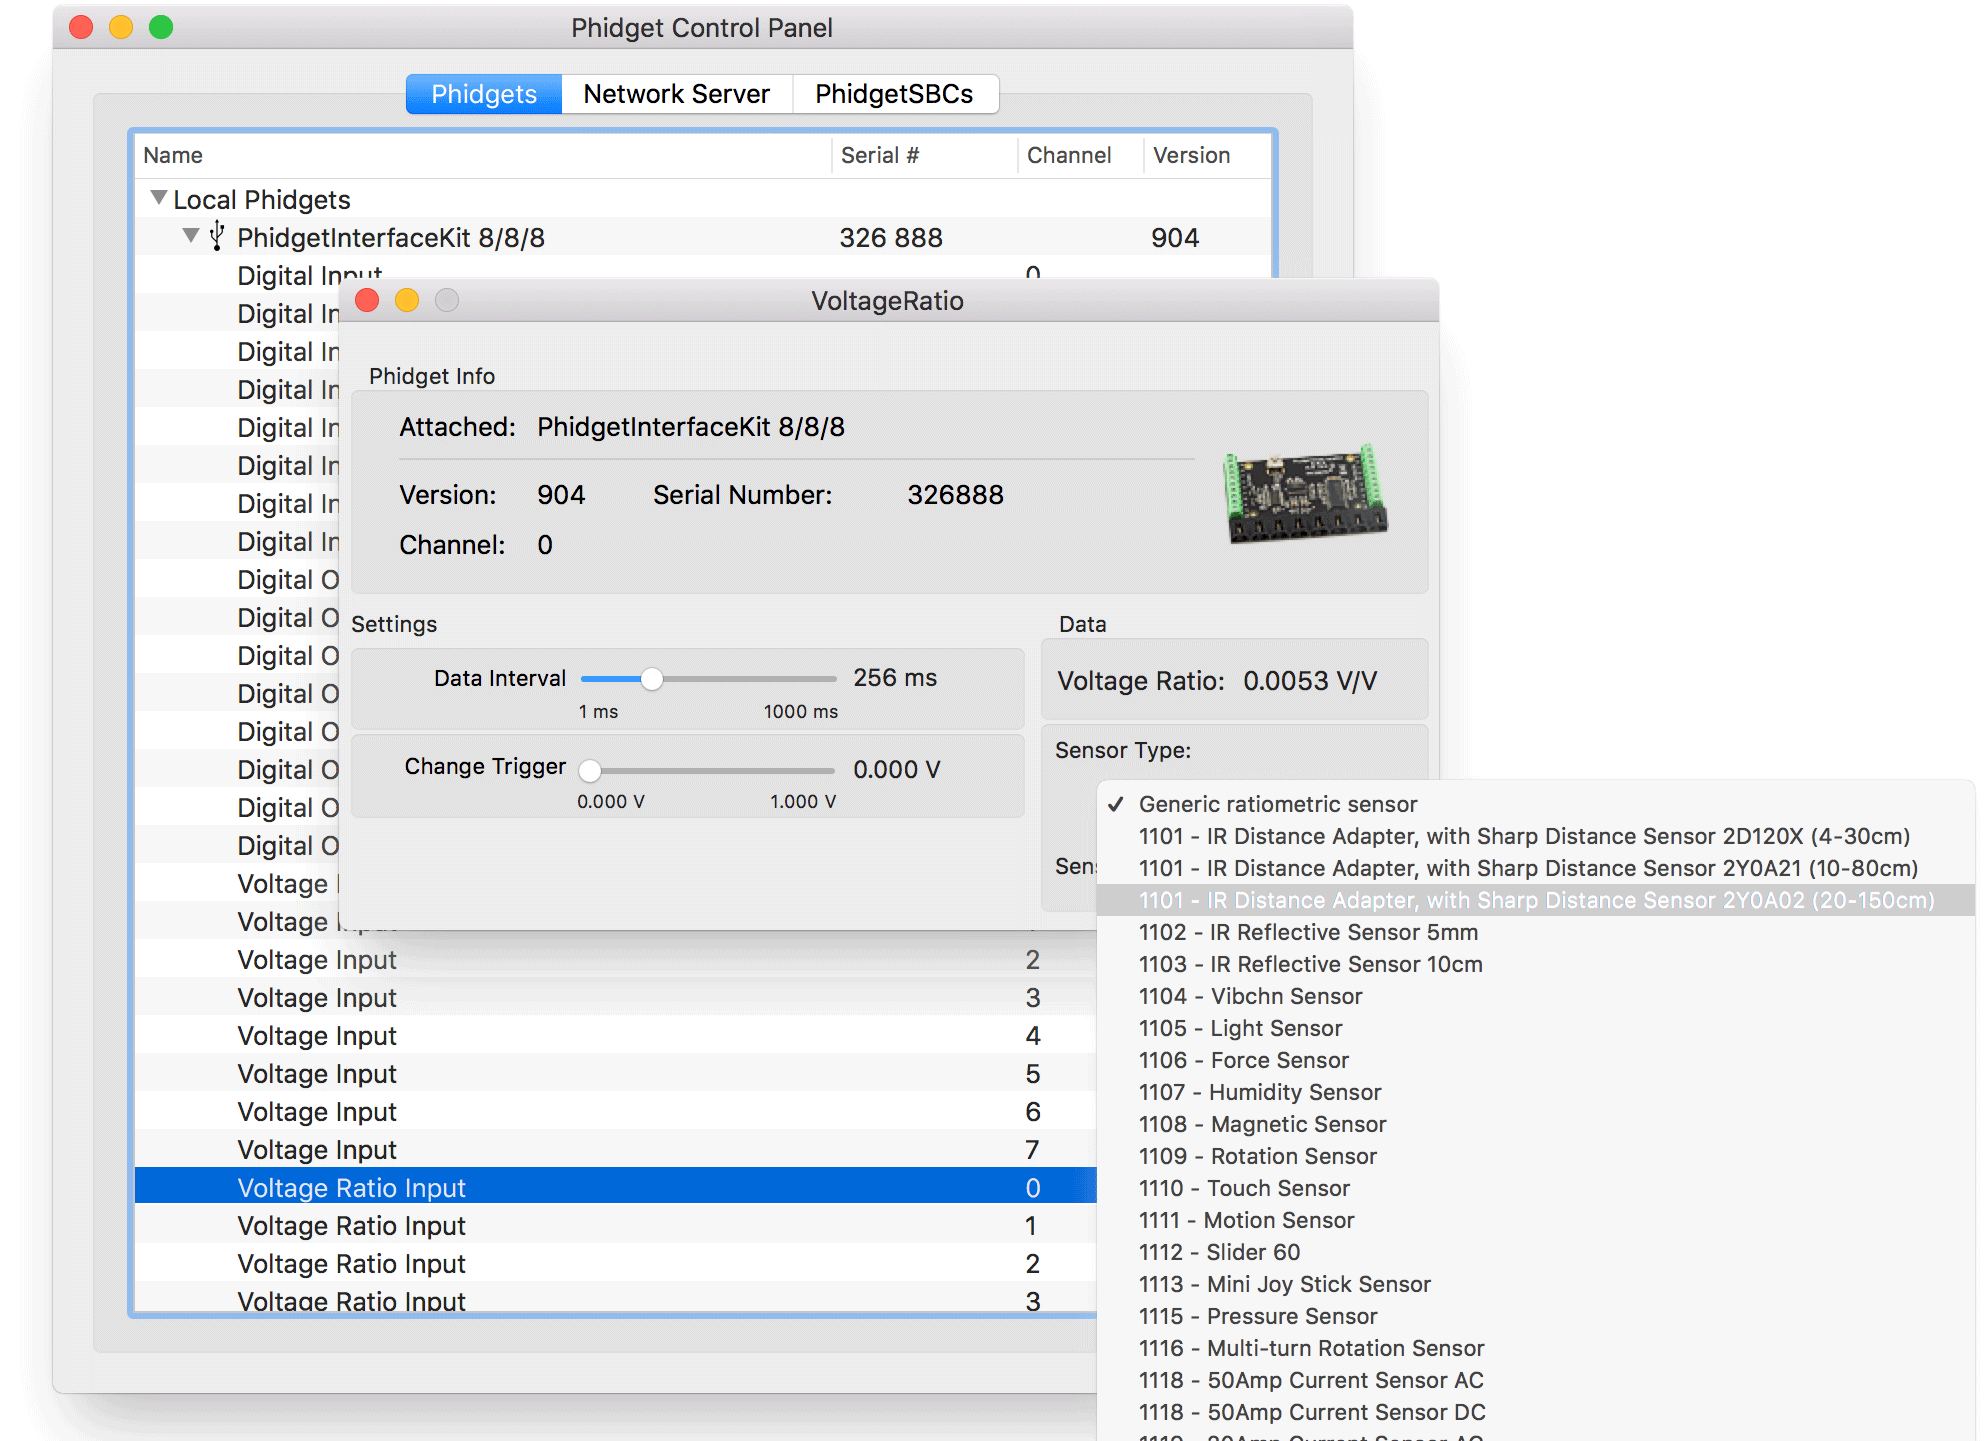
The first thing to figure out is the type of channel object to create. If we look at the control panel, we can see that the PhidgetInterfaceKit includes support for digital inputs, digital outputs, voltage inputs and voltage ratio inputs. The distance sensor is an input and is not digital. But is it a voltage input or a voltage ratio input?
At this stage, our best bet is to simply double-click both and check if the distance sensor is listed in their respective Sensor Type dropdown. In the case of the distance sensor, it is listed in the window belonging to the Voltage Ratio Input:
Alternatively, you can look up the sensor’s specifications and you will see the object type to create besides Controlled By:
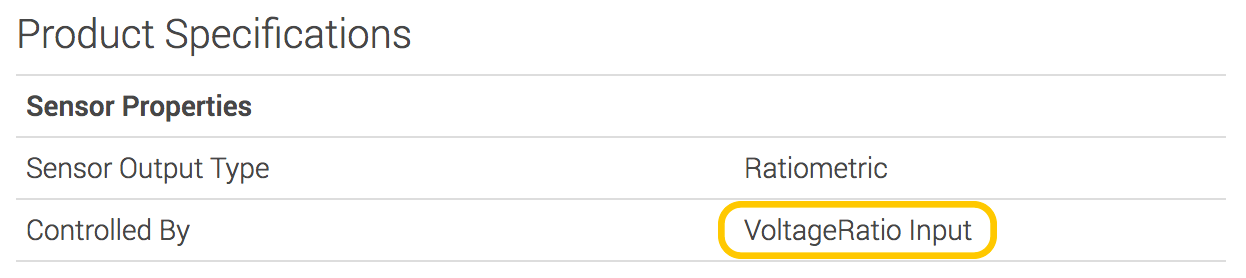
This means we need to create a VoltageRatioInput object. This object resides in the namespace we defined upon import:
|
1 2 3 |
function start() { let sensor = new jPhidget22.VoltageRatioInput(); } |
As you probably know, it is possible to have several PhidgetInterfaceKit devices which, themselves, are connected to several distance sensors. How do I tell the Phidget Network Server which of these sensors I want to talk to?
This is where the new concept of channel-matching comes into play. Basically, before opening the channel, you can specify some properties that the Phidget Network Server will use to find the device you want:
|
1 2 3 4 5 |
function start() { let sensor = new jPhidget22.VoltageRatioInput(); sensor.setDeviceSerialNumber(123456); sensor.setChannel(3); } |
By setting the device’s serial number, we make sure to limit possible matches to the device with a serial of 123456 (the PhidgetInterfaceKit, in our example).
You can fetch the serial number from the control panel.
If you don’t specify a device, it will look at all connected devices be they local or remote. This means you could accidentally connect to a device that’s not even hooked up to your own computer.
You can also set a “channel” to use. This is a very unfortunate choice of word. Here, “channel” means the port or input from the PhidgetInterfaceKit to which the sensor is connected.
You should always specify the channel. If you don’t, you will match the first port (a.k.a channel) that is a VoltageRatioInput even if nothing is connected to it.
You can use a variety of other criteria to match against:
- device serial number
- device label
- channel (a.k.a port)
- server name
- whether the channel is local or remote
If you are using the new VINT hubs, you can also use:
- hub port
- hub serial number
- hub label
- whether the device is a hub port or not
I’m sure there’s a rationale behind this whole channel-matching approach but it does feel a bit convoluted. When I connect a bunch of sensors, I know which port and device they are connected to. I don’t need pattern matching to find them. I guess some people must have a use for that. To me, it just feels more complicated for simple setups than the previous version.
Anyway, once our criteria have been defined, we can call the open() method to open the channel:
|
1 2 3 4 5 6 7 8 9 |
function start() { let sensor = new jPhidget22.VoltageRatioInput(); sensor.setDeviceSerialNumber(123456); sensor.setChannel(0); sensor.open().catch(err => console.log(err)); } |
The open() method starts pattern matching and returns a promise. However, we have to wait for the channel to be “attached” before actually using it. This is why we should add a callback function to be executed when the device is finally “attached”:
|
1 2 3 4 5 6 7 8 9 10 11 12 13 |
function start() { let sensor = new jPhidget22.VoltageRatioInput(); sensor.setDeviceSerialNumber(123456); sensor.setChannel(0); sensor.onAttach = function(ch) { console.log(ch.name + ' is attached!'); }; sensor.open().catch(err => console.log(err)); } |
Once the device is attached, we can start to listen for data changes on the sensor by using the onVoltageRatioChange function.
|
1 2 3 4 5 6 7 8 9 10 11 12 13 14 15 16 17 18 19 |
function start() { let sensor = new jPhidget22.VoltageRatioInput(); sensor.setDeviceSerialNumber(123456); sensor.setChannel(0); sensor.onAttach = function(ch) { console.log(ch.name + ' is attached!'); sensor.onVoltageRatioChange = function (ratio) { console.log('Voltage ratio: ' + ratio); }; }; sensor.open().catch(err => console.log(err)); } |
However, since we are using a distance sensor, it would be better to retrieve the actual distance being measured instead of the voltage. To do so, we must specify the type of sensor we are using. Voltage ratio sensors are listed in the VoltageRatioSensorType enumeration object as simili-constants:
|
1 |
sensor.setSensorType(jPhidget22.VoltageRatioSensorType.SENSOR_TYPE_1101_SHARP_2Y0A02); |
Note that setSensorType() should be called after the channel is attached.
As soon as we set the type, the onVoltageRatioChange() function stops being called. It is the onSensorChange() function that starts to fire. The onSensorChange() function receives two parameters: the value and the unit into which this value is expressed. In our case, this means we can retrieve the actual distance of the object being sensed in centimeters:
|
1 2 3 |
sensor.onSensorChange = function (value, unit) { console.log('Distance: ' + value + unit.symbol); }; |
You might think that the rate at which the events fire is a bit slow. If that’s the case, know that you can change it (the interval is expressed in milliseconds):
|
1 |
sensor.setDataInterval(50); |
Note that setDataInterval() should be called after the channel is attached.
Obviously, this is but a very small sample of what can be done with the Phidgets in NW.js. But, hopefully, it will get you started with the new API in less time.
Wrapping things up
If you wish, you can download the code used in this article. It is known to work with version 1.0.7 of the phidget22 Node module. Note that the module itself has not been included in the download package. You will need to install it with npm install.
Phidgets Inc. provides a number of examples for various sensors and actuators. You should definitely check them out to help you get started.
Finally, bookmark the new APIs JavaScript reference. It will be an indispensable tool.
2 Comments
Thanks for all of your above, just now experimenting with my PhidgetInterfaceKit 8/8/8
manipulating the Servo4, 2 relay driver board and a mini joy stick sensor.
Thanks for the good comments!