

NW.js, Johnny-Five & Arduino: A Wicked Trio
With the availability of version 0.13, it becomes trivially easy to use NW.js with the Johnny-Five robotics library. Combined with a microcontroller such as the Arduino, you get a very powerful end-to-end toolchain for physical computing. In this tutorial, we will show you how easy it has become to control external devices and gather data from sensors in such an environment.
It has been possible to use Johnny-Five with NW.js for a while. However, in NW.js v0.12 and prior, the procedure was a bit overwhelming for beginners. The good news is that, starting with version 0.13, NW.js now supports Chromium’s built-in chrome.serial API. For physical computing, this is major news. It means that, when used inside NW.js, modules like Johnny-Five no longer have to rely upon third-party native modules like node-serialport to talk to external devices. While node-serialport is great, it is a module that needs to be specifically recompiled for your platform (Mac, Linux, Windows), your architecture (32bit, 64bit) and your version of NW.js. This is no walk in the park…
With NW.js v0.13+, this is all a thing of the past…
To play along, you will need a board that is supported by the Johnny-Five library. We will use an old Arduino Duemilanove but pretty much any Arduino will do just fine. Even models that are not officially supported may just work. This is the case with our Duemilanove.
Setting Up Our Hardware
In order for Johnny-Five to be able to talk to our microcontroller, we must install Firmata on it. As it says on their website: “Firmata is a generic protocol for communicating with microcontrollers from software on a host computer.” Once the Firmata software is loaded on the board, Johnny-Five will be able to talk to it using the Firmata protocol and its JavaScript library.
How to load Firmata on your board will depend on its type. The procedure below is for Arduino-compatible boards. If you have another type of microcontroller that is supported by Johnny-Five, check with its manufacturer for specific instructions.
- Download and install the Arduino IDE.
- Plug in your microcontroller. If you are using a no-name Arduino clone, you may have to install a driver. Check with your reseller.
- Open the Arduino IDE.
- Select your board type (Tools > Board), processor (Tools > Processor) and port (Tools > Port).
- Open the
StandardFirmatasketch (File > Examples > Firmata > StandardFirmata). - Click the Upload button (arrow pointing right). Once it says “Done uploading”, you are all set.
Your microcontroller is now running Firmata as its default program. Since the program is kept in the non-volatile Flash memory, you only need to do this once. It will remain on the device even when you power it down.
Setting Up the Project
First, let’s create a folder for the project. In this folder, we will add a package.json manifest file to configure how NW.js will behave. We will use the most basic manifest file possible:
|
1 2 3 4 |
{ "name": "nwjs-johnny-five-demo", "main": "index.html" } |
Then, we need to install Johnny-Five. You can do so, as usual, by using the Terminal (Mac, Linux) or PowerShell (Windows). Simply go to the project’s directory and issue the following command:
|
1 |
npm install johnny-five |
Please note that this will only work with Johnny-Five version 0.9.20 and later. In order for Johnny-Five to use the newly available chrome.serial API, it needs to use the browser-serialport module instead of the node-serialport module. To do that, Johnny-Five and one of its dependencies (Firmata) needed to be modified. For this reason, I submitted a tiny code change for Johnny-Five and another one for Firmata. Those changes have been made available on NPM since late February 2016.
Important update: changes to Johnny-Five 1.1+ broke compatibility with browser-serialport. You should now use chrome-apps-serialport instead. Usage information is available on the project’s GitHub page.
Before starting to code, we need to patch a little problem. NW.js’ process.stdin has been plagued by issues for some time. One such issue prevents it from working properly with Johnny-Five. To work around it, you need to install a little Node.js module that fixes this issue:
|
1 |
npm install nwjs-j5-fix |
Now, create the index.html file referenced in package.json. Inside the HTML file, add a link to a script.js file inside which we will place our JavaScript code.
|
1 2 3 4 5 6 7 8 9 10 11 12 13 14 15 |
<!DOCTYPE html> <html lang="en"> <head> <meta charset="UTF-8"> <title>NW.js v0.13 + Johnny-Five Demo</title> <script src="script.js"></script> </head> <body> <h1>NW.js v0.13 + Johnny-Five Demo</h1> </body> </html> |
Now, we should be all set. Let’s code.
Let’s try it out!
To make sure everything works, let’s try the Hello, World! of physical computing: blinking a LED. In the script.js file, start by applying the fix discussed above:
|
1 |
nw.require("nwjs-j5-fix").fix(); |
Then, require the Johnny-Five library and create a new Board object. On Mac, this is usually enough:
|
1 2 |
var five = require("johnny-five"); var board = new five.Board(); |
On Windows, you usually need to specify the appropriate COM port like so:
|
1 2 |
var five = require("johnny-five"); var board = new five.Board({port: "COM3"}); |
You can find out the COM port number in the Arduino IDE or by going to the system’s device manager.
Then, let’s listen for the board’s ready event and, when triggered, create and blink the onboard LED (numbered 13):
|
1 2 3 4 |
board.on("ready", function() { var led = new five.Led(13); led.blink(500); }); |
All that is left, is to launch our project. There are various ways to do this. The easiest (albeit messy) way is to download NW.js (latest version, SDK flavor) and put all the uncompressed files directly inside the project folder. Then, simply run or double-click nwjs.app (Mac), nw.exe (Windows) or nw (Linux).
For cleaner ways to run an NW.js application, check out the How to Run Apps article in the NW.js wiki.
If everything went well, the onboard LED should blink steadily. The onboard LED is near output 13. In fact, if you connect a LED to output 13 (long leg in 13, short leg in GND), they will blink together.
If you have made it this far, it means your environment is working properly. You are ready to build your first project.
A Theremin-Like Instrument
As a first project, we will build a Theremin’ish instrument. To do so, we will gather distance data with a Sharp distance sensor and we will use that data to play a sound by using a piezo buzzer. Although this is a very simple demo, if you successfully make it to the end, you will know enough to attack much larger projects. As you will see, Johnny-Five’s API is very straightforward.
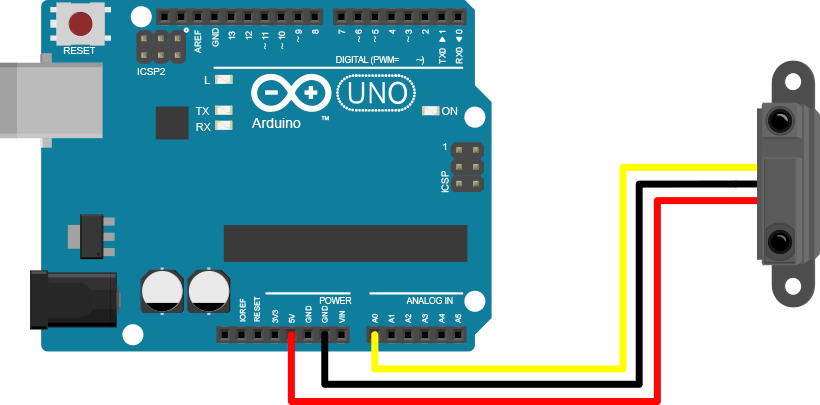
Let’s start by wiring the distance sensor. The red wire goes to 5V. The black wire goes to ground. The yellow wire (signal) will go to the analog input labeled 0:
When done, let’s add some code to check if it works properly. First, at the top of the script, let’s open the development tools window. This will let us view console output:
|
1 |
require('nw.gui').Window.get().showDevTools(); |
Then, in the already-existing “on ready” callback function, let’s create a new Proximity object. To do so, we must specify two things: the type of sensor and the input it’s connected to. Ours is the “GP2Y0A02YK0F” and it’s connected to analog input 0 ( A0). If you have a different model, check out the Proximity object’s API documentation.
|
1 2 3 4 |
var proximity = new five.Proximity({ controller: "GP2Y0A02YK0F", pin: "A0", }); |
To visualize if it’s working, let’s trace the data it is transmitting by listening to the data event and logging the detected distance to the console:
|
1 2 3 |
proximity.on("data", function() { console.log(this.cm); }); |
Moving your hand in front of the sensor should modify the output. Yeah!
As per its specifications, our sensor is accurate between 20cm and 150cm. Therefore, let’s ignore any data outside that range:
|
1 2 3 4 5 6 7 8 9 10 |
proximity.on("data", function() { var minDist = 20, maxDist = 150; if (this.cm > minDist && this.cm < maxDist) { console.log(this.cm); } }); |
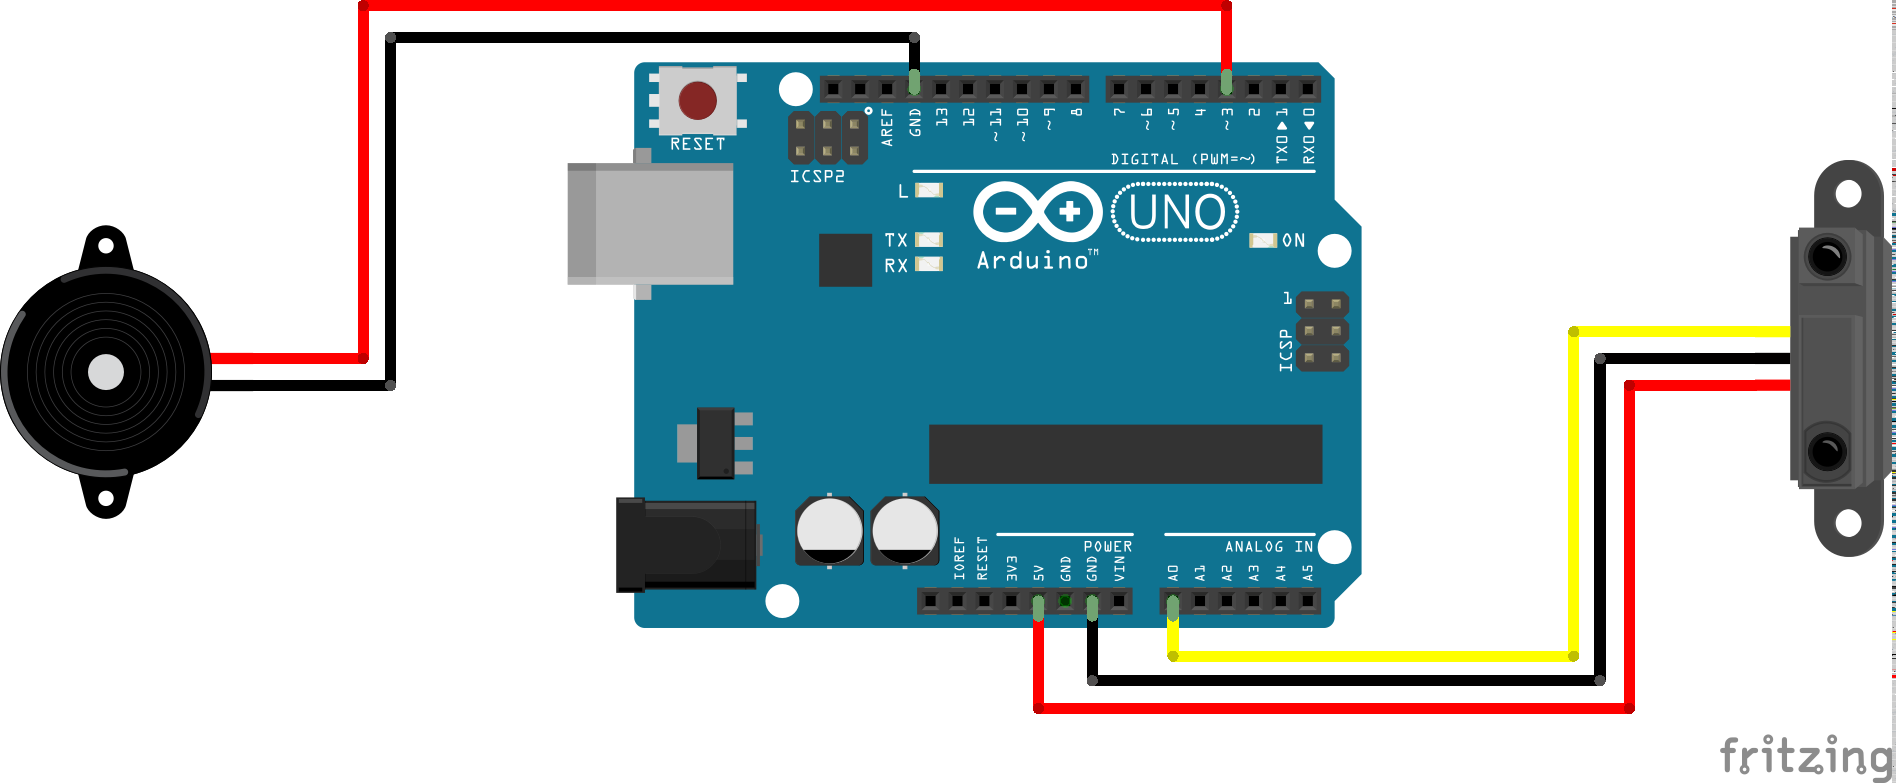
Excellent, we now have consistent data that we can use to generate sounds. Let’s hook up the piezo buzzer to digital input number 3 (PWM):

For the buzzer to emit a sound, we must use one of the digital outputs supporting PWM. Those can be usually be identified by a wave-shaped icon (~) or simply the letters PWM. If you want to learn what PWM means, check out the PWM article on Arduino’s website.
Our buzzer can produce frequencies in the 70-1000Hz range. So, we will need to convert the distance information fetched from the sensor into frequency information that the buzzer can play. Obviously, we also need to create a Piezo object so we can talk to it. Here’s the complete ready callback function:
|
1 2 3 4 5 6 7 8 9 10 11 12 13 14 15 16 17 18 19 20 21 22 23 24 25 26 27 28 29 30 31 32 |
board.on("ready", function() { var led = new five.Led(13); led.blink(500); var proximity = new five.Proximity({ controller: "GP2Y0A02YK0F", pin: "A0" }); var piezo = new five.Piezo(3); proximity.on("data", function() { var minDist = 20, maxDist = 150, minValue = Math.sqrt(70), maxValue = Math.sqrt(1000); if (this.cm > minDist && this.cm < maxDist) { var ratio = (this.cm - minDist) / (maxDist - minDist); var value = (ratio * (maxValue - minValue)) + minValue; piezo.frequency(value * value, 1000); } else { piezo.off(); } }); }); |
If you run that, you should now hear the buzzer play a sound at a pitch that matches your hand’s distance from the sensor. Obviously, the 1$ piezo buzzer does not produce an exquisite tone. However, the key here is recognizing that you are now able to use sensors to gather data and you are also able to control external devices. When you stop to think about it, that’s pretty amazing!
Even better, you are doing that within a browser environment. This means that the usually GUI-less Johnny-Five library can now have a visual interface created with your beloved HTML, CSS and JavaScript. For example, we could decide to affect the opacity of the HTML tag by using the sensor data. Simply add the following code in the conditional block to fade in or out the text by waving your hand:
|
1 |
document.getElementsByTagName("html")[0].style.opacity = ratio; |
As you browse through Johnny-Five’s API, you will realize that most input and output components are not harder to use than the distance sensor and the buzzer used in this demo. Just find the right hardware and you can do amazing stuff with NW.js, Johnny-Five and Arduino.
Download the Source Code
If you want, you can download this demo’s source code directly. Beware that, to remain within a reasonable size, the zip file does not contain the node_modules folder or NW.js.
The schematics in this article have been created with Fritzing.
![]()
![]()
12 Comments
Simpler indeed
Please don’t link to firmata.org. That mediawiki site is no longer maintained, link to: https://github.com/firmata/arduino
I changed the link. Thanks for pointing it out, Jeff.
I didn’t understand the reason for using NW.JS as opposed to plain node.js. I think NW.JS would be useful if there was some UI to show.
You say:
That’s precisely the idea. Generally, one would use Johnny-Five to control a robot and no interface would be necessary. However, if you want to use Johnny-File in a physical computing context, having a UI or visual output might be the whole point. If I create an interactive installation for a museum, I could retrieve information from visitors (position, height, number, etc.) via Johnny-five and use that to control what is projected on the screen in front of them. Even for robots, it might be very useful to have a control panel where you can adjust various parameters.
I hope this makes it clearer.
Thanks for the solution!!!
Wow! i spend a week trying to use johnny5 in nwjs and you solved it in 5 minutes thank you very much 😀 it is WORKING!!! 😀
Awesome!! I’m really impressed with this but struggling a little on why my data returned to me in the console is just 0,1,2,or 3…
nw.require(“nwjs-j5-fix”).fix();
require(‘nw.gui’).Window.get().showDevTools();
//windows
var five = require(“johnny-five”);
var board = new five.Board({port:”COM12″});
board.on(“ready”, function() {
var led = new five.Led(13);
led.blink(500);
//photoresisor with 10k resistor voltage divider
var sensor = new five.Sensor({pin:”A0″});
sensor.on(“data”, function(data) {
console.log(data);
});
});
what am I missing here. sry for the trivial question
I’m not sure why you are getting such output. Did you check the documentation? There’s even an example with your exact setup.
I got it to work using the example . thanks again!
Now onto the impossible HCSR04 I can’t get to work. HAHA 🙂
fun…. but not so easy sometimes
Could the Arduino also be programmed with this serial port access?
I’m not sure I understand your question… To use Johnny-Five, Firmata must be installed on the Arduino. If you want a custom program on the Arduino while still using Johnny-Five, I guess you would have to customize the Firmata sketch.